


A lot of people didn’t quite like the idea of having a thick slab of glass in front of their cases. So NZXT made sure to put as many holes as it can on the H7 Flow.
So I have been using the cooler master mb520 case since 2019 with a Ryzen 9 3900X and a 3080Ti in it.

Now as compared to it the H7 flow is a huge case with a height of 50.5 cm and a width of 23cm. So that means I won’t be bruising the back of my hands much, anymore, thanks to the spacious design inside of the H7 flow.

And the feet are almost 1 inch long – so even from the bottom, the case wouldn’t have any trouble sucking the air in. And the feet aren’t loose in any way and are of excellent quality plastic.

Now I really like the white/black combination of this case. The paint finish on the case is excellent.

The blacks have a rough finish over it.

The case is extremely open and broadminded – broadminded because of that width. And open as the panels on it opens up from every single direction.

It adopts a completely screwless design – so no more losing those screws once the screws screw you, and get lost. It does require some force to pull them open. As these tiny cute blobs are what hold the panels inside firmly.
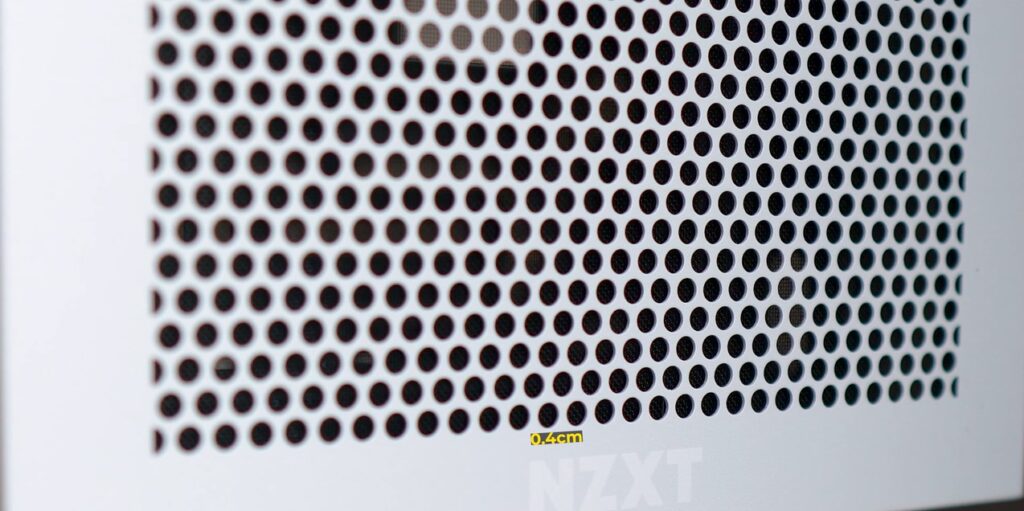
The holes on the front and top panel have a 0.4cm width. Which means they aren’t tiny. So with a lot of air inside – you should expect more dust particles to find their way in too.
The power supply goes to the bottom of the case.

The case comes with a single 120mm fan on the rear. And a similar fan on the front.
It would have been so much better if the case came with a set of more pre-installed fans on the front too. Maybe NZXT could launch some bundle offers so that in this pricing the overall value can lure more people in.


There are 2 filters on the bottom and they are easy to pull out and install back in. And the top filter has kinda the same story after you remove the panel first.

The filter on the front panel is kinda married to the panel, but they can be easily separated.

I really liked how clearly the screws had their labels printed on their individual packs. The 1 huge page of the panel also quite clearly denotes – which screw should go in and screw whatever.
I am using an Asus TUF X570 gaming plus motherboard and the stand-off screws were already installed in the case.

The case supports 360mm AIOs on both the front and top sides. And looking at how HOT the next generation of desktop processors are, anything less than a 360mm AIO or a radiator wouldn’t make sense in a modern desktop case. Unless you are not really going above the Ryzen 7s or Intel i7s, and are not really pushing their clocks. But even with them, I wouldn’t be pairing anything less than a 360mm AIO.

You can add really thick performance fans or radiator on the front – as it has a really deep, almost 2 inches depth to it.

I installed the radiator up top and there the case had these long slits that will make it quite easy to position the radiator the way you want. I pushed this 240mm radiator of the Deepcool LS520 a little towards the front. So that it can easily accommodate my large hand for putting in the 6-pin eATX 12V CPU connector there.

The power supply shroud has ample depth that even with the cables it was pretty easy to put the power supply in. I mean even if I tried I couldn’t have been rough with it.

The case supports 4+2 2.5” SSDs or 2 23.5” hard disk drives. But it’s a bit tricky to get this bracket out. You have to put your long screwdriver from the top.(TWSS?)
And then only you can take it out. You can avoid doing this if you just wish to put the hard drive in and just screw the hard drive from the front of the case. And that can happen only if you have no more fans installed there.
But for that, you’d need to live with the obsession that your hard drive isn’t really properly secured from the other end. Yeah, there are many drawbacks to that – so just take it out and secure the drive properly inside for a peaceful life ahead.

To install a 2.5” SSD you need to unscrew and take out the bracket from the back, and then screw the 4 screws on the SSD. And after that just screw it back on the backplate. Man NZXT is really possessive about your hard drives.
If you have more than 2 2.5” drives then the case comes with 2 more brackets for them.

Installing the 3 fans on the front was also an easy peasy job as you can easily open the whole long bracket by just unhooking the 2 screws on the top. Really glad they opted for this design choice.
The default cable bar for the 24-pin connector wasn’t much help to me, as I really wanted to show off these custom cables I have.
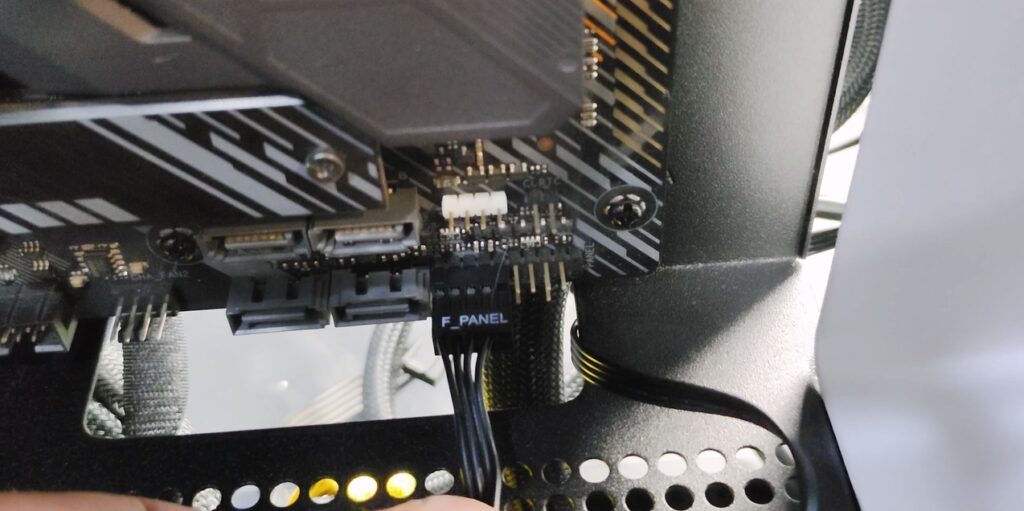
I just love the front panel connector NZXT makes on its cases. As it really solves one of the most obsolete problems building PCs have.
The rear fan cable and the USB connector cable are pretty long so you can route them wherever you want.

There are a lot of slits and velcros on the right side of the case for cable management. Pretty sure a lot of cable sorting enthusiasts would love to see the many slits and holes and whatnot here, that might just help them sort at least 1 part of their unsorted life.

Even a basic setup like this looks quite clean and nice inside the case. But the case literally screams to have a custom liquid cooling setup inside of it.

I wasn’t sure if the fans behind the front panel would emit noticeable lighting, but because of the quite wide sizes of the holes on them, good radiancy was visible.

I also loved the way the non-RGB front looked initially. But I don’t mind adding a few RGB components inside my PC for that extra performance these LEDs emit in their glory. No one can really argue with that.
Well, I can always turn off the fans and still have that as an option. But pretty sure I won’t ever do it.
Now I tested my Ryzen 9 3900X – in 2 ways with the Deepcool LS520 on top of it. Once with just the 1 stock fan in the front. And another with 3 SilverStone air blazer 120mm fans.
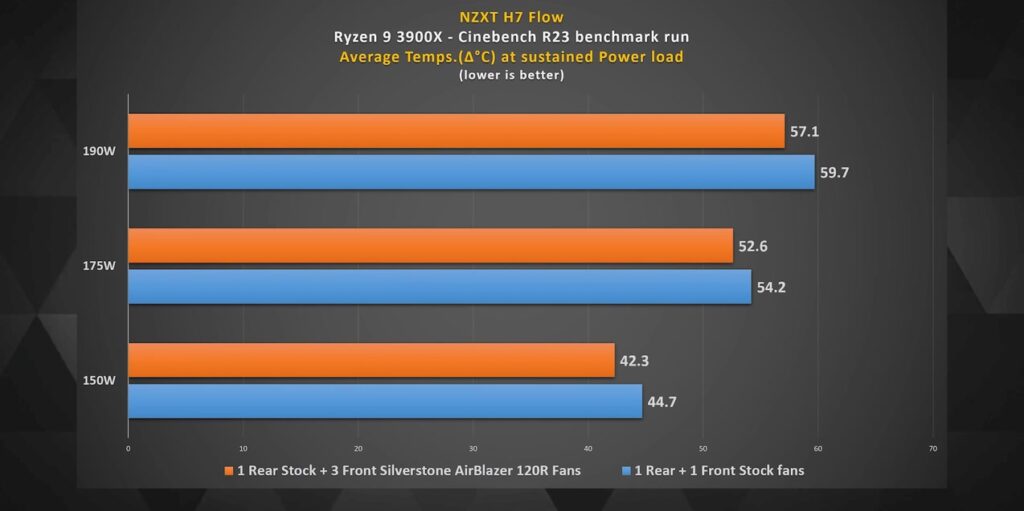
And this shouldn’t be a surprise that 3 fans would beat the 1 stock fan the case came with at the front. But I was honestly impressed to see not-so-marginal differences.

The difference with the 1 front fan vs the 3 fans in both these CPU and GPU stress tests didn’t return a difference of more than 2 or 3-degree celsius.
So a pretty well-built case overall, and I honestly loved its screwless design for the panels. NZXT made sure to keep the design super flowy with the many many holes all over the case.
Yes, the price would have been more justified if the case came with 4 fans instead of 2. But with NZXT’s build quality and design aesthetics, NZXT does ask for a premium for its stuff.
The case is also a blessing for a PC reviewer like me as it’s super spacious and because of its quite modular panel design, I would have fewer fears of opening and closing it regularly for all my testing.
🛒Amazon India: https://amzn.to/3xe8DNI
🛒Amazon US: https://amzn.to/3Bz5sDb
💬Discord: https://discord.gg/TsMHuPhjQ2
So if you choose this case and want to support my efforts on this video then you can buy from the affiliate links above. Take care humans. MuBot out.